Processing your assigned work
When you first log in, based on your user permissions and your account configurations, the work order summary page may include the following work orders. *Note: If you are not seeing what you expected on your work order summary page, please contact your system administrator to discuss your user permissions.
- Work orders you created
- Work orders that are assigned to you
- Work orders for the location(s) that you are assigned to
- Work orders tied to the work categories for the department that you are assigned to
These work orders will include a brief description of the work requested, status, and priority. You can use the site drop-down menu or location hierarchy tree on the left-hand side of the page to filter the work order list to include work orders for other locations and sites that you are assigned to.
- A "No data to display" message will show under the following circumstances:
- You have not created work orders for the selected location
- You are not assigned to the selected location based on the Location Assignments set up for your user account
- You have not created or been assigned to work orders for the selected location that are tied to your assigned work categories based on the Work Category Assignment set up for your user account
Watch the video tutorial:

How to process your assigned work
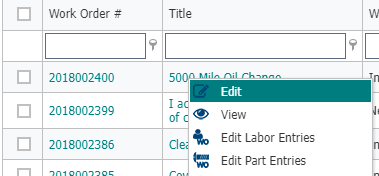
- Right-click on the work order you would like to process, and click Edit.
- The Work Order Details section may include some important information about the work order, such as estimated hours to complete the job, or the expected date and time the work should be complete.
- The WO Status is an important field where you can update the progress of this work order as needed. For example, you can mark the work order In Progress as you begin the job, and mark it Complete when you have finished the job. *Note: The statuses available will vary based on the current status of the work order.
- The Work Requested section gives more detailed information about the work that needs to be done.
- Beneath the Work Requested section is the source of the work request. This could be an entire site, a specific location, or an asset.
- As you perform work on the job, enter what was done to address the work requested into the Action Taken field.
- Use the Comments field to add any additional notes about the work order.
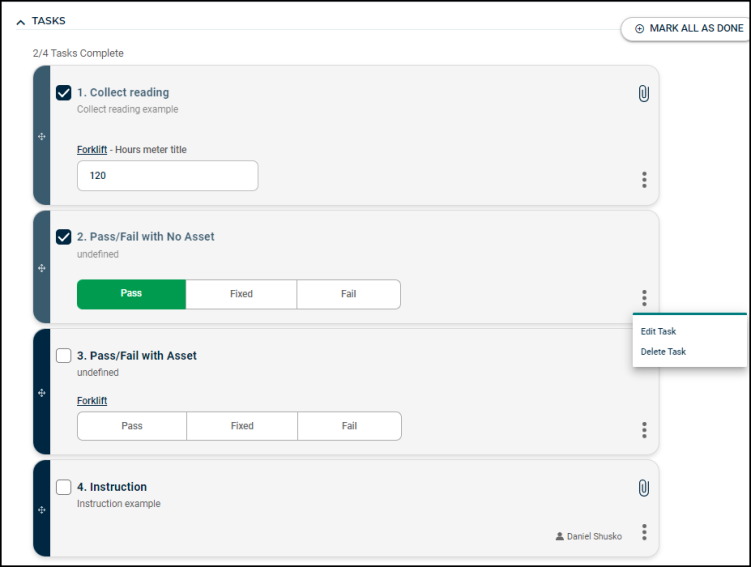
- If the work order contains information in the Tasks/Steps section, follow the tasks as listed on the work order.
- Click the box to the left of the task number to mark a task as done.
- A task may require you to take a meter reading. If so, enter it in the field below the listed asset.
- A Pass/Fail task asks you to select whether the asset passes a review, fails a review, or failed the review but was fixed.
- When you select either Pass, Fixed, or Fail, the task will automatically be marked complete.
- If you select Fail on the task, you have to option to generate a new work order for the follow-up work right from the task.
To edit the content of a task or add a note, click the three dots at the bottom right of the card and select Edit Task.
- Adjust any fields that are necessary in the window that appears.
- Click Update Task.
- Record your labor hours on the work order in the Labor section.
- Record your parts and/or purchases on the work order in the Parts section.
- Record any equipment transactions in the Equipment Usage section.
- Take note of any documents the originator of the work order may have uploaded in the Attachments section.
- If you need to link the work order to another, click the Add button in the Associated Work Order section.
- At the top of the page, click the Save button and choose your save action to record any edits made to the work order.
